The new Stardust polish store is now live. And as promised, here is the link to the new store. As you remember, Stardust is the polish I reviewed last night, with Black Hole and White Dwarf. And she posted on instagram this morning, that if you buy two full bottles, you can take 20% off your order with the code 20TWO through April 1st at 10 pm. Go shop! By lots of her pretty polish!! And there are two White Dwarfs to choose from. A new sheer version, and the opaque version I received.
And speaking of stores opening, ellagee, the polish I received for review earlier this week is now completely live and open!! Here link is here. And she has a sale going on too!! The first one is on a new glitter polish called "Party Like It's 1999" and it's 50% off right now ($2.50 for a mini, and $4.50 for a full sized bottle). There's another sale, but you have to follow her on Facebook to find it :)
Go do some Easter shopping today! And show support to these (and all) wonderful indie brands!!
~Kat
Saturday, March 30, 2013
Friday, March 29, 2013
Another Indie Review: Stardust Polish
I've recently discovered so many indie polish makers on Instagram. And I want to BUY ALL THE POLISHES!! Unfortunately, I'm not independently wealthy, or wealthy at all actually; so I can't buy them all. But, I just couldn't pass on a few. And the most recent one to show up on my doorstep was Black Hole by Stardust Polish.
She's about to release the first half of her Space collection, and had a pre-order about a week ago. As soon as I saw Black Hole, I KNEW I needed at least a mini. It's a gorgeous black holo, packed with holographic glitter. So I did it. It was completely an impulse buy; I barely breathed between seeing the picture and entering my PayPal information. And then impatiently waited the week or so it took for me to receive it.
And finally on Wednesday it was waiting for me when I got home from work. And to make things even better, she gave me a mini of another color White Dwarf. It's a sheer white packed with tons of glitter.
.JPG)
And since Hubs was still off Wednesday night, I didn't have to wait for BeBe to go to bed before I started playing!! While they were playing whatever crazy monster games fathers play with their daughters, I did this:
.JPG) P.S. that nail envy was found for $7.99 at Marshalls. Love.
P.S. that nail envy was found for $7.99 at Marshalls. Love.
So since there were two polishes, and I couldn't decide which to use first, I decided on a mani that used both of them, duh.

The Black Hole is a great formula. It applies really well, there was some slight balding on one nail. And it really was jammmm packed with glitter. As for the White Dwarf, I really liked it in the bottle. When I told Drema (the polish creator) that I received the polishes, she wanted to know specifically what I thought about White Dwarf, because she thought she may have made it too opaque. My middle finger has Sally Hansen White On under the White Dwarf, and my ring finger is just 2 coats of White Dwarf. It's difficult to see the glitter in the pictures. It's easier in real life, but I told Drema I agreed with the idea of making it less opaque. But I do love both of these polishes, and they are unlike any other polishes I have. I actually think Black Hole is my favorite polish in my collection.


She's about to release the first half of her Space collection, and had a pre-order about a week ago. As soon as I saw Black Hole, I KNEW I needed at least a mini. It's a gorgeous black holo, packed with holographic glitter. So I did it. It was completely an impulse buy; I barely breathed between seeing the picture and entering my PayPal information. And then impatiently waited the week or so it took for me to receive it.
And finally on Wednesday it was waiting for me when I got home from work. And to make things even better, she gave me a mini of another color White Dwarf. It's a sheer white packed with tons of glitter.
.JPG)
And since Hubs was still off Wednesday night, I didn't have to wait for BeBe to go to bed before I started playing!! While they were playing whatever crazy monster games fathers play with their daughters, I did this:
.JPG)
So since there were two polishes, and I couldn't decide which to use first, I decided on a mani that used both of them, duh.

Picture taken in lightbox with flash.
The Black Hole is a great formula. It applies really well, there was some slight balding on one nail. And it really was jammmm packed with glitter. As for the White Dwarf, I really liked it in the bottle. When I told Drema (the polish creator) that I received the polishes, she wanted to know specifically what I thought about White Dwarf, because she thought she may have made it too opaque. My middle finger has Sally Hansen White On under the White Dwarf, and my ring finger is just 2 coats of White Dwarf. It's difficult to see the glitter in the pictures. It's easier in real life, but I told Drema I agreed with the idea of making it less opaque. But I do love both of these polishes, and they are unlike any other polishes I have. I actually think Black Hole is my favorite polish in my collection.

Taken in lightbox with no flash

Taken in lightbox with no flash

Please ignore the chip, this was the following day, and soley my fault for being so hard on my nails at work that day. This is (obviously) taken in the sun. This color is seriously amazing in the sun!!
Stardust Polish's space collection will be available for purchase
starting tomorrow, March 30th, at stardustpolish.bigcartel.com. She's
in the middle of a last minute switch from Store Envy, so I'm unable to
link that site for you, sorry! Once it's live, I will update the blog
with the link. She's also currently got some thermal polishes that look
uh-mazing, as well as plenty of other colors to choose from. So check
her out. You can also find her on Instagram @stardustpolish.
~Kat
Tuesday, March 26, 2013
ellagee Polish Review
All products in this review were sent to me, free of charge from the creator, in exchange for my honest opinion.
I have something so so so so exciting for you today!! My very first indie polish review!!
I found ellagee polish on facebook through the page of another nail blogger. She was looking for bloggers to review her debut collection, and I jumped at the chance. Her first collection is called Sparkling Spring Wildflowers and they are gorgeous bright, springy glitters!!


I wish my camera had cooperated, especially with this one, because the glitter is so amazing. The glitter in the picture that is picking up purple or grey or green are actually holographic glitters. ANd there are about 3 or 4 different sized glitters in here. Again, each application of this polish puts an amazing amount of glitter on the nail, and it stays put. This is the perfect glitter for a glitter gradient design, and I can't wait to try that out with Fly Me to the Moon. Like I said in my first impressions, my dad's favorite musician is Frank Sinatra, so anything Frank reminds me of him. And since my parents currently live in Germany, I don't get to see him as much as I would like. So that gives this polish even more points in my book :) I also think the name is really fitting for the color.


~Kat
I have something so so so so exciting for you today!! My very first indie polish review!!
I found ellagee polish on facebook through the page of another nail blogger. She was looking for bloggers to review her debut collection, and I jumped at the chance. Her first collection is called Sparkling Spring Wildflowers and they are gorgeous bright, springy glitters!!

*Photo courtesy of ellagee polish*
So when I got home from work yesterday, my ellagee package was waiting for me!! I couldn't wait to tear into it and put the polish on.
I got three mini polishes, two from this collection and one from an even newer collection that will be releasing later this spring.

From the Wildflower collection I received Fluttery Meadow (green) and Prairie Clover (purple), plus Fly Me to the Moon from her upcoming You're The Top collection. She also sent a cute little file and a pack of Smarties, that BeBe promptly declared hers and ate before I could even say anything.

First Impressions:
*These were my two favorites from the collection, and I was super stoked to get them as my review!
*What a cute bag they are in!
*Awww, a mini file (BeBe named it Aurora)
*Fly Me to the Moon!! Frank Sinatra. (My dad is a huge Frank Sinatra fan, and we danced to a Frank song at my wedding)
*Can I get away with sneaking away to do my nails without Hubs and BeBe realizing I'm gone?
I was able to sneak off into our bedroom while Hubs worked on some homework, and BeBe watched TV and played princesses; just as soon as I made them dinner. I did a quick test of the polish on three fingers right away, and that picture can be found on the ellagee facebook page. And then I did the colors over coats of a matching polish. First up is Fluttery Meadow:

Please forgive my macros today, my camera didn't want to cooperate with me.
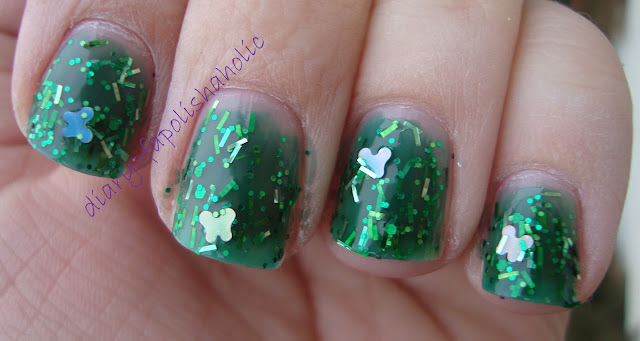
Fluttery Meadow is a gorgeous spring green jelly base with silver bar glitter, and green hex glitter and circle glitter, as well as silver circles. And the best part, silver butterflies!! So cute, and such a nice touch. This color went on nicely, but out of the three it had the least glitter per swipe on the nail. Does that make sense? Of course, as with all larger glitter, you have to fish for the butterflies most of the time, but that is expected. The color is rich from the first application and builds nicely. It was mostly opaque in two coats by itself, but three would be perfectly opaque. This really is a perfect green for spring!

One coat of Fluttery Meadow over one coat of Sinful Exotic Green

Two coats of Fluttery Meadow alone
Next is Prairie Clover, a pretty purple jelly with a ton of glitter packed in!

There is medium purple/pink/red glitter, with a variety of sizes of silver glitters, with silver square glitter. Or is it pale purple? Either way, it's gorgeous! It goes on the nail so so well, and there is a great amount of glitter with each application. It goes on the nail well, and the glitter tends to stay put; it doesn't seem to gravitate towards the tip of name like some glitters will. This is my favorite of the three. The formula is wonderfully jelly and easy to work with. Like Fluttery Meadow this builds nicely on the nail and takes about three coats to be fully opaque.

Two coats of Prairie Clover over one coat of Sally Hansen Xtreme Wear Grey Area

Two coats of Prairie Clover alone
And finally, is Fly Me to the Moon. It's a clear base with loads of silver glitter.

I wish my camera had cooperated, especially with this one, because the glitter is so amazing. The glitter in the picture that is picking up purple or grey or green are actually holographic glitters. ANd there are about 3 or 4 different sized glitters in here. Again, each application of this polish puts an amazing amount of glitter on the nail, and it stays put. This is the perfect glitter for a glitter gradient design, and I can't wait to try that out with Fly Me to the Moon. Like I said in my first impressions, my dad's favorite musician is Frank Sinatra, so anything Frank reminds me of him. And since my parents currently live in Germany, I don't get to see him as much as I would like. So that gives this polish even more points in my book :) I also think the name is really fitting for the color.

Two coats of Fly Me to the Moon over one coat of Orly Dazzle

Two coats of Fly Me to the Moon alone (sorry about the blur)
Over all, I'm really impressed with this collection. The colors are bright and perfect for spring, and the formulas are really nice. I think the names fit well with the colors, and the colors all work for the collection. ellagee polish is available for sale on etsy here. Currently she is having a preorder, and the store will officially open March 30th. The Sparkling Spring Wildflowers is the only collection that will be available, and again that collection includes the Fluttery Meadow and Prairie Clover. The collection with Fly Me to the Moon will be released in April. To check out reviews of some other colors from these two collections, check out Rambles of a Polish Addict. You can find ellagee on facebook as well here. Go show her some love!!
~Kat
*Again, all products were sent to me free of charge in exchange for my honest opinion and a review.
Saturday, March 23, 2013
Fairy Tales
For weeks now, I've been seeing swatches and hearing (well, reading) people talk about Sinful's Cinderella. I was afraid it was a part of a limited time collection; why else would I not have seen this and bought it?
Well at Target today, I found it. Right in the permanent collection that Target seems to have recently expanded. It's kind of a bummer though, because it's impossible to capture all it's beauty in a picture! I've done my best:


Well at Target today, I found it. Right in the permanent collection that Target seems to have recently expanded. It's kind of a bummer though, because it's impossible to capture all it's beauty in a picture! I've done my best:

It's a gorgeous sheer baby blue, with a duochrome shimmer that changes from gold, to amber, to pink.
So I did a quick(ish) base. It took 4 coats to get it opaque, so I think it would be a good idea to put a coat of white on before the blue. And then I had the genius idea to stamp with my Essie Good as Gold. And I used my bundle monster crown stamps. I used both on each nail, and I was having some serious stamping issues today. I couldn't get the stamper to pick up the whole image. It took 3 or 4 times to get it right. But I had a grand idea, and didn't stop. I kinda wish I did! It's busy, and the entire image didn't always transfer onto the nail right or fully. But it also kind of looks tarnished, and broken and old; much like I feel an old crown/tiara might.

I'm also watching somewhat of a fairy tale on TV. Well more like a love story, The Vow. Does this movie piss anyone else off?! Rachel McAdam's character really pisses me off. And who would question Channing Tatum when they woke up from a coma and he said "I'm your husband"? So it's almost over, and I'm pretty sure I remember crying at the end, so I'm going to end this post with another shot of my mani tonight, before I become a blubbering idiot.

~Kat
Friday, March 22, 2013
Splatter Nails!
Today, I tried a nail art I had been eyeing for some time now, but had always been afraid of how messy it would be. But I decided to just go for it tonight. I did splatter nails!! They look super cool, but they are still beginner nails haha, so they aren't perfect. I had to play around with how far away the straw needed to be from my nails so a giant splotch didn't just cover the whole nail. That did happen a lot on my first hand, but it's not terrible looking.
I started with a base coat of the Seche Vite base coat, and two coats of Sally Hansen Xtreme White On.
.JPG) I really need a new white, or some polish thinner. This polish (and all my Xtreme Wears) are SOOOO thick!! It's really hard to work with.
I really need a new white, or some polish thinner. This polish (and all my Xtreme Wears) are SOOOO thick!! It's really hard to work with.
Next I laid out a whole section of newspaper across my table, just to make sure all spots were polish could potentially splatter were covered. I'd cover more than you think you need to, just to be sure!!
I picked my colors (Orly's Blue Collar, Beach Cruiser, and Velvet Rope), and used one straw per color. I cut the bendy part off too.

Then I put drops of polish one color at a time on a piece of paper. I dipped the straw into the color and made sure there was some polish up inside the straw, not just covered around the edge. Then I placed the straw over my nail and blew hard, once into the straw to splatter the polish.
Tip: The farther from your nail you put the straw the more splatter effect you get. The closer you are the more it covers the full nail.
For some reason, I didn't think to tape off my nails on my first hand (left hand). And let me tell you, that is a MESS.
 I got smarter on the second (right) hand. And I taped it just like I would for water marbling. I use three pieces of scotch tape, one across the bottom of the nail, and the other two up each side of the nail. Sorry I don't have a picture of how I tape.
Since it was the second hand, and I learned from my mistakes, I like my right hand better, which is quite unusual! Usually my right hand is more shaky since I'm right handed. Here's my final RIGHT hand:

As far as nail art however, this is one that is pretty easy, and fool proof. And there is no wrong way for it to look, Every nail will look different, and thats ok!! Just be sure to remember to tape the nail off, or you will spend quite a bit of time cleaning up your entire finger!

And I have a favor to ask you all. A fellow nail blogger, Kat, from Kat Stays Polished is in a Blogger Contest on Facebook, to be a featured beauty blogger. If you could please follow THIS link, and just like the post, I would really appreciate it!!
Thanks everyone!! Have a great weekend!
~Kat
I started with a base coat of the Seche Vite base coat, and two coats of Sally Hansen Xtreme White On.
.JPG)
Next I laid out a whole section of newspaper across my table, just to make sure all spots were polish could potentially splatter were covered. I'd cover more than you think you need to, just to be sure!!
I picked my colors (Orly's Blue Collar, Beach Cruiser, and Velvet Rope), and used one straw per color. I cut the bendy part off too.

Then I put drops of polish one color at a time on a piece of paper. I dipped the straw into the color and made sure there was some polish up inside the straw, not just covered around the edge. Then I placed the straw over my nail and blew hard, once into the straw to splatter the polish.
Tip: The farther from your nail you put the straw the more splatter effect you get. The closer you are the more it covers the full nail.
For some reason, I didn't think to tape off my nails on my first hand (left hand). And let me tell you, that is a MESS.


As far as nail art however, this is one that is pretty easy, and fool proof. And there is no wrong way for it to look, Every nail will look different, and thats ok!! Just be sure to remember to tape the nail off, or you will spend quite a bit of time cleaning up your entire finger!

And I have a favor to ask you all. A fellow nail blogger, Kat, from Kat Stays Polished is in a Blogger Contest on Facebook, to be a featured beauty blogger. If you could please follow THIS link, and just like the post, I would really appreciate it!!
Thanks everyone!! Have a great weekend!
~Kat
Wednesday, March 20, 2013
I'm still here!!
Sorry I've been MIA lately, I've been swamped at work with a project and Hubs was off the last two nights, so I spent some quality time with him and BeBe. But there's a few things going on in my nail world lately.
First of all, last week I mentioned I bought a new China Glaze holo in Cosmic Dust off Ebay. Well, I received that in the mail on Monday. I could not WAIT to tear into it, and test it out. What a disappointment!! I was hoping the negative reviews I read were wrong. They weren't. First of all, when I would put the color on, not only was it really thick, but it would "bald". It would pull the polish off, everytime I would go over it with another coat.
 See how obnoxious this is?! Which means also, that it took about 3 coats to make it opaque.
 Even then, it was a terrible application; it showed every flaw and imperfection.
.
China Glaze had said, since this was a "true holo" it would be slightly more expensive than their everyday polish, with an MSRP of $14.99. Which I personally think is ridiculous, considering how poor quality I think this is. Compared to Color Club at $10, it's a waste.


First of all, last week I mentioned I bought a new China Glaze holo in Cosmic Dust off Ebay. Well, I received that in the mail on Monday. I could not WAIT to tear into it, and test it out. What a disappointment!! I was hoping the negative reviews I read were wrong. They weren't. First of all, when I would put the color on, not only was it really thick, but it would "bald". It would pull the polish off, everytime I would go over it with another coat.


.
China Glaze had said, since this was a "true holo" it would be slightly more expensive than their everyday polish, with an MSRP of $14.99. Which I personally think is ridiculous, considering how poor quality I think this is. Compared to Color Club at $10, it's a waste.

Here's a comparison of the two, the first and ring finger are China Glaze, and the other two are Color Club Angel Kiss.
So for my mani last night (and today) I took the China Glaze off, and replaced it with the Color Club. It was a sunny (but FREEZING) day out today, perfect for a holo. And then I did some funky geometric shapes with striping tape and black polish. It turned out uh-mazing! I'm so happy with it, that tonight I'm going to do it to the rest of my nails.

So pretty, right?! I'm in love.
And the other thing that I' super excited about, I figured out how to use the macro setting on my digital camera!! Just in time for my review of ellagee's first collection. Speaking of ellagee, she'd got a presale going on now, and all products will be shipped out April 1st, after the official opening of her shop. I believe she said all preorders will be shipped with a little surprise to say thank you!! You can purchase or check it out here.
And here's a look at my macro ability, using Orly's Right Amount of Evil:

Hooray!!! I love it!
~Kat
Sunday, March 17, 2013
Holy Excitment Batman!
I have so many exciting things to tell you about from this weekend!! And I have a mani for you :)
First of all, Erin over at Black Sheep Lacquer created a fun new nail polish a few weeks back, and opened up the name of the polish to her fans.


First of all, Erin over at Black Sheep Lacquer created a fun new nail polish a few weeks back, and opened up the name of the polish to her fans.

Photo courtesy of Black Sheep Laquer
I entered the name "Circus Freak", and she picked it!! So as a thank you, she will be sending me a mini of the polish. I will definitely be swatching and reviewing this polish for you guys when I receive it! Look at all that amazing color and glitter!!
Second, I entered an Instagram giveaway for a TON (literally, a ton) of prizes. I wasn't thinking I had a shot of winning, but when I signed onto Instagram last night I was surprised and excited to see that I won! Listen to all these goodies:
1. Color Club Beyond the Mistletoe set of 7 glitter polish
2. Dermystique Moisturizing Skin Serum with 24k gold flakes (interesting!)
3. Swatching Wheel
4. Crushed Velvet for nail art
5. 2 Sation nail polish (Confessions of a Nail Tech and The One & Phony)
6. Revlon Moon Candy Polish
7. 3 Princessa nail colors (green glitter, teal glitter, and copper glitter) and finally,
8. Wet n Wild 8 color eyeshadow palette.
How amazing does that all sound!?
And the most exciting part!? I found a new indie polish maker on facebook. I messaged her and asked if she was looking for people to review and swatch her polishes, and she was!! Her line is called EllaGee, and you can find her on Etsy soon, and this is her Facebook page. Here's a sneak peek at her first collection:

Photo Courtesy of EllaGee polish
Super gorgeous right!? I can't wait to test these babies out.
The least exciting part of this whole post is my nails tonight haha. They are actually a nail art fail. A while back I bought a 10 pack of crafting scissors and I haven't used them since my chevron mani from a few weeks ago. I really wanted to do a wave mani, with two contrasting colors. I love the colors, but the idea in my head was so much cooler. And since I wasn't happy with the first hand (my left hand) I tried a different pair of scissors on my second hand.
So I started with a base color of OPI DS Reserve. Such a gorgeous pink holo, that goes on gorgeously.
I added a watermark, because I'm worried about people stealing my photos. I see so many photos all over the internet from my favorite nail blogs, with no photo courtesies, so I've made a watermark to protect my photos.

And the contrasting color was Orly Liquid Vinyl. I cut pieces of scotch tape with the scissors, and placed it over half my nail and painted the black. I immediately peeled the tape off, so it didn't pull away the polish, making a nail mess.

This is obviously my left hand. And I wish this was a more defined wave. It kind of just looked like I drew a freehand line down the center of my nail.
.JPG)

And this is my right hand. I like this cut more, but I wish it was a little sharper. I mean it's ok, but I guess I'm my own worst critic. And of course, there is that stupid black smudge from the Seche. Wah.
So both of my hands are different, and that is going to drive me crazy tomorrow, but I don't want to take it all off tonight.
Hope you all had an awesome weekend!!
~Kat
Saturday, March 16, 2013
Born Pretty Goodies!!
A few weeks ago, I was on one of my favorite beauty blogs The Helpful Housewife. She had a post about a 10% coupon code for Born Pretty. She talked about all the cute phone cases they had that were cheap. And since I had just gotten my upgraded iPhone, I decided to check it out. I was able to get a new, unique Hello Kitty phone case and screen protector for $4!! With free shipping!! Of course, it comes from China/Hong Kong, so the shipping could take some time. They say 16-20 days is average. Mine came to me in just about 2 weeks, which was a lot faster than I expected.
.JPG)
.JPG)
.JPG)
Being a three year old, BeBe loves Hello Kitty, so she hasn't let my phone out of her sight since I put the case on. I have contacted Born Pretty about getting a button for the side of my blog, so when you're interested in browsing or purchasing, you can just click the link. I'll update you when I receive that!
.JPG)
.JPG)
.JPG)
Being a three year old, BeBe loves Hello Kitty, so she hasn't let my phone out of her sight since I put the case on. I have contacted Born Pretty about getting a button for the side of my blog, so when you're interested in browsing or purchasing, you can just click the link. I'll update you when I receive that!
Friday, March 15, 2013
Google Reader.
I'm sure you've heard from others, Google decided to end Google Reader July 1st of this year. Which means you will no longer be able to follow all of your blogs though Google. However there is a solution, I have an account on Bloglovin and you are able to follow this blog, and all other blogs you follow through that site. They also have an import all button, and they will import all the blogs you currently follow with google for you.
So, if you could click the little (well it's not THAT litte) Eiffel Tower button over there, it will take you to my blog on Bloglovin, where you can then follow this and other blogs, once Google Reader closes. I know it's a hassle, but I appreciate each and every one of my readers, and I would hate to lose you because of silly google!!
~Kat
Thursday, March 14, 2013
Huge Off-Day Haul!
Since I have a three year old at home, and daycare is FLIPPING expensive, I only work three days a week. So Tuesday BeBe and I went in search of polish deals. I heard recently been told by one of my polishaholics that TJ Maxx and the like were unexpected places to find cheap polish. So we went around town to all the discount stores, and really only found one decent deal. I got a two pack of Nicole by OPI for $5. Most of the stores had a few Orlys, a few Sephoras by OPI, some sets I had never heard of (Beauty Connection, I think?) But nothing super great; however they did say they routinely get new polish in.

I also decided to try my luck at Sallys, since there are so many new Spring collections out and companies were getting rid of some permanent line colors to make room for new ones. Mine had a large selection of mostly China Glaze Cirque de Soleil, since they were the only store in my area that didn't have them BOGO. I picked up four China Glaze for $3.29 a piece, and one regular priced new permanent color Orly.
 From right to left: Escaping Reality, Tree Hugger, Watermelon Rind, Water You Waiting For, and Jealous, Much?
Finally we had to swing by Target because I had completely run out of remover!! Oh the horror!! And in their clearance bins I snagged a 2-pack of Revlon nail buffers for $0.88!! My nails were so stained from a dark polish, and I thought they might help. They are the perfect size to carry in my purse too, in case it's ever needed.

So I spent a grand total of $26.52 I got 7 polishes and two buffers. Not a bad job!
I really love the Jealous, Much? by Orly, being in my obsessed with mint stage and all. It's the only one I've swatched so far. I'm going to try to get them all swatched by the weekend so I can have a post on them, they all look so pretty!!

Not my cheapest haul, that was 4 polishes for $6 when Sallys had clearance polish an additional 50% off, but still not a bad deal, considering China Glaze is currently 2/$11 on sale at Sallys. And speaking of China Glaze, I don't have it yet, but I just ordered one of their new holos off Ebay for a STEAL. Look for that coming soon!
~Kat

These are Prized Possession Purple and One Time Lime.
I also decided to try my luck at Sallys, since there are so many new Spring collections out and companies were getting rid of some permanent line colors to make room for new ones. Mine had a large selection of mostly China Glaze Cirque de Soleil, since they were the only store in my area that didn't have them BOGO. I picked up four China Glaze for $3.29 a piece, and one regular priced new permanent color Orly.

Finally we had to swing by Target because I had completely run out of remover!! Oh the horror!! And in their clearance bins I snagged a 2-pack of Revlon nail buffers for $0.88!! My nails were so stained from a dark polish, and I thought they might help. They are the perfect size to carry in my purse too, in case it's ever needed.

Sorry for the stock photo, but I really needed the buffers and ripped into them instantly!!
So I spent a grand total of $26.52 I got 7 polishes and two buffers. Not a bad job!
I really love the Jealous, Much? by Orly, being in my obsessed with mint stage and all. It's the only one I've swatched so far. I'm going to try to get them all swatched by the weekend so I can have a post on them, they all look so pretty!!
Clockwise from top left: Escaping Reality, Water You Waiting For (both Cirque colors), Watermelon Rind, Tree Hugger
Center: Jealous, Much?
Not my cheapest haul, that was 4 polishes for $6 when Sallys had clearance polish an additional 50% off, but still not a bad deal, considering China Glaze is currently 2/$11 on sale at Sallys. And speaking of China Glaze, I don't have it yet, but I just ordered one of their new holos off Ebay for a STEAL. Look for that coming soon!
~Kat
Monday, March 11, 2013
Three Hard Candy Swatches and Review
Did you all have a great weekend? Are you experiencing the "Daylight Savings Hangover"? I certainly was today.
So, this weekend after my baby free night, I went to Walmart, in search of Hard Candy Polishes. When I was in middle school in the 1990s, Hard Candy was huge! I coveted it since Alicia Silverstone wore 'Sky', a light blue (what wasn't sky blue in the late 90s!?) on David Letterman. But since I was in 6th grade and was making very little babysitting, I could only dream since then it was being sold in department stores. The bottles back then where small and square, with a plastic (usually) heart shaped ring around the handle.
 I had this ad hanging around my room; I cut each piece out numerous times and hung them everywhere. Seeing this brings back serious memories.
So when I saw they partnered with Walmart and brought out new polishes, I couldn't WAIT to try it out. It took a few trips to a few Walmarts, but it paid off and I finally found it! I bought three to try initially.
.JPG)
.JPG)
From left to right: Tinsel Town, Gummy Green, and Cocoa S'more. Sorry they aren't in the same order on the wheel!!

 Tinsel Town is gold, blue, green and purple bar glitter in a thin blueish base. The first two fingers in just Tinsel Town (2ish coats) and the last two is 1.5 coats over one coat of Orly's Liquid Vinyl. I will use it over another color 99% of the time. I haven't been a huge fan of bar glitter in the past, but I really like this!

This is Cocoa S'More. It's a thin beige cream with black and white glitter throughout, giving it this speckled appearance. This is actually a complete dupe for Nails Inc. Sugar House Lane from their Sprinkles line! With a top coat, it's smooth and not harsh from the glitter. I love this speckled look!

This is Gummy Green, it's a mint green cream with the same white and black glitter from Cocoa S'more. I love this color (it's the mint green obsession); it makes me really want mint chocolate chip ice cream. I just realized that's probably why I took BeBe for a mint oreo blizzard from DQ after work...
Anyways, after swatching I did a mani with all Gummy Green with a Cocoa S'more accent ring finger. I really like these polishes. It's not Sky, but they still satisfied my inner 13 year old.
~Kat
So, this weekend after my baby free night, I went to Walmart, in search of Hard Candy Polishes. When I was in middle school in the 1990s, Hard Candy was huge! I coveted it since Alicia Silverstone wore 'Sky', a light blue (what wasn't sky blue in the late 90s!?) on David Letterman. But since I was in 6th grade and was making very little babysitting, I could only dream since then it was being sold in department stores. The bottles back then where small and square, with a plastic (usually) heart shaped ring around the handle.

So when I saw they partnered with Walmart and brought out new polishes, I couldn't WAIT to try it out. It took a few trips to a few Walmarts, but it paid off and I finally found it! I bought three to try initially.
.JPG)
.JPG)
From left to right: Tinsel Town, Gummy Green, and Cocoa S'more. Sorry they aren't in the same order on the wheel!!


This is Cocoa S'More. It's a thin beige cream with black and white glitter throughout, giving it this speckled appearance. This is actually a complete dupe for Nails Inc. Sugar House Lane from their Sprinkles line! With a top coat, it's smooth and not harsh from the glitter. I love this speckled look!

This is Gummy Green, it's a mint green cream with the same white and black glitter from Cocoa S'more. I love this color (it's the mint green obsession); it makes me really want mint chocolate chip ice cream. I just realized that's probably why I took BeBe for a mint oreo blizzard from DQ after work...
Anyways, after swatching I did a mani with all Gummy Green with a Cocoa S'more accent ring finger. I really like these polishes. It's not Sky, but they still satisfied my inner 13 year old.
~Kat
Subscribe to:
Posts (Atom)